Wednesday, December 26, 2012

Christmas Ribs!

It's been a while!

Everything's been super hectic due to the holidays! Visitors, old friends, family, last minute shopping, mini trips, eating food from restaurants I missed so dearly, catching up with sleep...I've been having a good time. And as you all know, yesterday was Christmas! I hope you had a good one :) This year I had the honor of making Christmas dinner for the family. This was a good thing because a) my mom didn't need to panic about the food b) my awesome boyfriend was there to help and support c) I got to choose what we ate. So I chose RIBS. Christmas turkey is overrated. Thanksgiving is turkey day, not Christmas. Who else out there agrees with me?

Oh, and on a side note...the ribs come with a funny story. The temperature change for me has been rough. Going from the 80s to 50s isn't easy for me. So I mostly rely on my old high school sweats (I have no reason to buy new winter clothes when I'm living in Hawaii!). And yeah, I'm well aware that I look like a slob most of the time. But whatever, I'm in Santa Cruz. Yoga pants, hoodies, and Ugg boots are usually good enough. So I walk up to the butcher counter at New Leaf wearing my baggy bright red sweatpants, an old blue Santa Cruz High swim hoodie, and my well-used Ugg boots. I ask him how much three racks of ribs would be. They're around 50$. Expensive! At least from a college student's perspective. So I hesitate and go for two racks. He wraps them up and hands them to me.  "Merry Christmas, I threw some extra's in there," he says to me, sounding real nice and genuine. I didn't stop to think about that until I got home. So when I get home and unwrap them I realized he threw in an entire free rack of ribs. Score! But why? I'm assuming the butcher felt bad for me because I looked like a sad little girl in hobo clothes who just wanted some good quality ribs for Christmas. Little did he know, I'm no hobo, I'm just super lazy. I guess, sometimes, laziness pays off.

Anyways, Merry Christmas nice butcher man! You have some good karma coming your way!

And thanks to my new culinary skills (thank you Chef Leake!) I made some delicious Christmas ribs. Along with honey glazed sweet potatoes, sauteed chard, roasted garlic & chive mashed potatoes, and a yummy salad with homemade dressing.


The recipes are fairly simple. Pictures might not even be needed!

Honey Glazed Sweet Potatoes

Preheat your oven to 375 F degrees. I bought a pre-weighed bag of yams from Trader Joe's. But use however many you need. Cut them up into 1-2" dice (the smaller, the quicker they'll cook!). Keep them in cool water to prevent them from changing color. When you're ready to cook, drain the potatoes from the cold water and put in a large bowl. Squeeze honey over the potatoes to coat them, along with a generous drizzle of olive oil. Sprinkle cinnamon over the top (use your judgement) and fresh ground salt and pepper. Toss the potatoes and make sure they're all coated. Use two foil-lined sheet pans, spread the potatoes out on the sheet pans and pop in the oven for around 30 minutes.

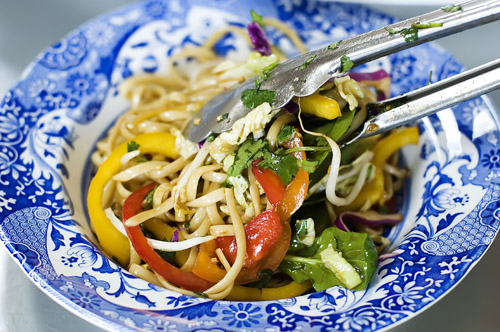
Easy Salad & Dressing Recipe 

I bought a bag of baby arugula (yummy and peppery!) and bag of baby spinach. Mix the two greens together in a large bowl. Add a big handful or two of roasted sunflower seeds. For the cheese I chose ricotta salata (pre crumbled from Trader Joe's), it is SO good...if you've never tried it, try it. It's texture is comparable to feta, because it is crumbly, but it's not salty like feta and it has a smoother mouth feel. I cut up some little grape tomatoes and put those in there, too.

For the dressing, pour about 1/2 a cup (maybe a little more) balsamic vinegar into a bowl. Whisk it up & slooooowly drizzle in extra virgin olive oil until the mixture is thick, like chocolate sauce consistency! Now, grab some honey and drizzle a little in there to taste. Mince two garlic cloves and mix that in there, too. Finally, use fresh cracked pepper and a sprinkle of sea salt to finish it off.

Toss the salad with the dressing right before service! Yum :)


Now for the...RIBS! 


Ingredients:

  • Pork baby back ribs (however many racks you want, I could fit two into my pot)
  • Pickling spices, about 1/8 cup (I looked up how to make my own, easy!) 
  • Dry rub (store bought or homemade); I made mine out of brown sugar, black pepper, white pepper, garlic powder, cayenne, allspice, chili powder, paprika, dry mustard, and salt
  • BBQ sauce (again, store bought or homemade!), I almost used a whole bottle
Instructions:
  1. In your largest pot (and I mean GRANDE), fill with water and the pickling spices then place over high heat.
  2. While waiting for the water to boil, cut your racks of ribs in half. Find a bone in the middle of each rack and cut along that bone. 
  3. When the water is boiling, add the ribs. Cover the pot and reduce the heat down to a simmer. 
  4. Cook the ribs in the pot of water and spices for about 40-60 minutes (my racks were fairly small so I went 40 minutes).
  5. While you're waiting, you can go ahead and make your dry rub. 
  6. Remove the ribs from the pot and set on a sheet pan to cool. Also, preheat your oven to 400 F degrees. 
  7. When the ribs are cool enough to touch, sprinkle the dry rib on and massage it in there (do both sides!). There shouldn't be any chunks of the dry rub, brush them off. You don't want to bite into a big chunk of dry spice rub...yuck.
  8. Use two (more or less, depending on how many you're making) foil-lined cookie sheets to put your ribs on. Then pop them in the oven for 7 minutes.
  9. After 7 minutes, take them out, flip them over & bake for another 7 minutes.
  10. Now it's saucy time! Start with the service side down (the meaty side!), use a small spoon to spread around the BBQ sauce. Don't use huge globs. There should be a nice coating on the ribs, but not huge mouthfuls of sauce. Make sure to cover all of the exposed meat. Pop them in the oven, service side down for 10 minutes. 
  11. Take the ribs out of the oven. Flip them over so they're service side up (the meaty goodness side) and sauce them with your spoon. Put them in the oven for 10 minutes. WOOO RIBS. Done! If you want them a little charred, you can put them under the broiler for a few minutes. 
The meat should be tender and fall right off of the bones. Omnomnommm! 

*Note: ribs can be cooked a lot of different ways! This is the way I learned how to do it in culinary school and I was pleased :) it's a good method to use when you want ribs but it's too rainy outside to barbecue. 

Nommmm away :) 


Tuesday, December 11, 2012

Good Stumblin' Finds

I have a few days left to kill before I fly home. I don't have much to do, so I woke up at 11:30am today...and the only thing I have planned is to go to kickboxing later. I'm not complaining, though, I'm loving the freedom. I can watch Grey's Anatomy for hours, sleep when I please, and go lurk around wherever I want, when I want. And the best part is I HAVE ENERGY! Woohoo! But for now, I'm stumbling on stumbleupon. I discovered this wonderful procrastination tool my freshman year of college. Pretty entertaining stuff!

Oh, the lazy life...

Here's some good stuff I found:

Chocolate Chip Peanut Butter Cups


Cute animals!
Videos & pictures. Look! I promise it will make you smile :)


Pop Danthology 2012 - Mashup of 50+ Pop Songs

Just cause it's almost 2013


Some of the ideas are pretty cool! 
Here are a few examples:

You could add herbs and all kinds of stuff to it! Fancy butta. 
Probably tastes way better than store bought butter.

Hope that entertained you like it entertained me! 


Sunday, December 9, 2012

Coconut oil shortbread "tart" with honey almond glaze

Happy Sunday! It's baking day!


Today I made an adapted version of "fifteen spatula's" recipe called Bee Sting Bars.
It's basically a buttery, melt-in-your-mouth shortbread covered with honey almond glaze. The original recipe has you make it like cookie bars or something. But I used a spring form pan. It gives it a nicer presentation!


Ingredients (shortbread):

  • 6 Tbsp. coconut oil
  • 6 Tbsp. butter, room temperature
  • 7.4oz AP flour*
  • 1.1oz whole wheat flour *
  • Sea salt
  • 1/2 Tsp. vanilla extract (or almond)

    *1 3/4 C flour. If you don't want to deal with weighing out ingredients just use this measurement. Use whatever kind of flour you want. I ran out of AP flour so I used some whole wheat flour, too. 
Ingredients (glaze):
  • 6 Tbsp. butter
  • 2 Tbsp. honey
  • 3 Tbsp. sugar
  • 1/4 Tsp. almond extract
  • 1 Tsp. vanilla extract
  • 1 1/2 C sliced almonds 
You also need: 
  • 9" round spring form pan
  • rubber spatula/wooden spoon
  • mixing bowl
  • an oven
  • measuring spoons
  • measuring cups
  • optional: a scale
Alright, first off we gotta make the shortbread!
So grab a mixing bowl, rubber spatula, the butter and coconut oil.


Put the coconut oil & butter in the mixing bowl and mix together until there are no (or very few) lumps.


Yeah, it's a little chunky. But that's okay. Nobody's perfect yo. 

Next, add that sugar! 


Then the vanilla.


Then a few grinds of sea salt (or a hefty pinch)! 


Flour time yo! Measure it out however you want to. I used my pretty kitchen scale :)


Mix the flour in there until incorporated. It'll look crumbly, that's good. 


Bust out your spring form pan and pour the crumbly mix in there. Press in with your hands. 


When it's all pressed in there, pop it in the fridge for 30 minutes or so. I had it in there for 45...so I could watch an episode of Grey's Anatomy :) hehe. But yeah start to preheat your oven to 350F degrees during this time! 


Falalalalalalalalaaaaaaa

When it's getting close to the end of your 30 minute refrigeration time. 
Get prepared and make yo honey almond glaze. 

The topping is easy. 
Gather all of your ingredients. 

Some up-close shots of the honey, almond extract, and almonds I used:


So just dump it all in a saucepan. Let everything melt and get all happy in there. Cook over a medium-high flame. (Or if you're using electric, medium-high heat). Bring it to a simmer for two minutes. 

Take the shortbread out of the refrigerator. And dump this gooey goodness on top. 

Spread it around.

Pop it in the oven! 
Cook for about 20 minutes. 
It took more like 26 more minutes for mine to cook.
How do you know when it's done? The top should turn more golden brown. 
You can probably see the difference in my pictures. Check them if you aren't sure.

Take your treats out of the oven when done :)
Let them cook on the counter for a bit. You still have to take off the outside part of your spring form pan...if you do that when it's piping hot you could easily burn yourself. So be patient! Read a book or something. Do some jumping jacks. Seriously, these are full of buttery goodness....you might feel better if you do some jumping jacks...

When it's cooled. Unlatch the spring form pan and push from the bottom up to release the shortbread. Be careful! Don't drop it! Wahhh that would be sad! 

Now look at that beauty :)

Yum yum yummmmay 


Lookin' gewwwwd. 
Make sure to share! 

Saturday, December 8, 2012

Finger Foods (6 days!)

I love planning things. I can be kind of a control freak in the kitchen so watch out. Don't mess with mah plans. But my Mom told me I can be in charge of our holiday dinner so I'm pretty stoked to plan my Christmas Eve dinner. I guess it's early, but the more prepared the better, right? I'll keep you posted on that. I have lots of ideas right now! But I'll set that aside for later. I have another job to do today!

I've been asked for help. I need to find finger food recipes! Good thing I love recipe hunting. So here you go, Mom, here are some good recipes that I hope you can make:

Malaysian Chicken Satay
No utensils required! Easy clean up.


Asian Noodle Salad
Good make-ahead recipe. Probably tastes even better the next day. Just be careful that you don't overcook the noodles because they might get soggy. 


LUMPIA! I don't have grandma's recipe in my brain right now...but call her up, make some! Or ask her to make some for you. For those of you who don't know what lumpia is, it's basically a Filipino egg roll. Here's a recipe. It uses ground pork. In my family, our lumpia is pork-free because some of us don't eat red meat. So instead of pork my grandma poaches chicken, cuts it up, and adds it to the vegetables. I like it a lot better that way. I've been raised with it, so I guess that's why. Whatever floats your boat!


Quinoa Salad
This website has a great variety of quinoa salad ideas. But remember, recipes are just like formulas. There is always room to be creative with the ingredients and flavors. As long as you cook the quinoa right, you really can't mess up...unless you have a terrible pallet I guess. Also don't mess with dressing ratios. But yeah, other than that you can get as creative as you want! Use flavored oils, experiment with different kinds of vinegar. Add some spices, fresh herbs, vegetables, whateva you like. Just make sure you taste, taste taste. That's the only way you know something's gonna taste good. You don't want to serve something to other people if you wouldn't eat it yourself. 


Cut up some pita bread and/or veggies. Pretty easy do-ahead recipe. And something new! Kind of looks like guacamole. Sounds yummy! 


Good luck, hope you can use some of these recipes! 

Wednesday, December 5, 2012

Poachin' dem eggs


Yung humma & Flynt Flossy represent. 
It's a joke! 

I've always been afraid of poaching eggs. I'm not sure why. It just seems weird to me. Like...how does it not turn into egg water soup?

Our last section in class was breakfast. And let me tell you, I've never cooked that many eggs in my life! (Also, wasted them...all in the trash...wahhh) But the point is, eggs are hard to cook. To cook eggs properly takes some serious skill. Have you ever tried flipping an egg before without a spatula? I dare you to try.

Poaching! How does the egg not turn into egg water soup? White Distilled Vinegar. I'm not gonna get all scientific on you. But it does something to help keep the whites close to the yolk blah blah I don't know. It just works. Don't argue with it...Google it if you care that much.

Yeah so 1 Tbsp of white distilled vinegar to 1 quart of water. You could even do a 50/50 ratio. Just make sure you don't let the water boil too long with the vinegar in it because it will evaporate. Make that mistake and you will have egg water soup!

Before you begin to poach, know that there are three types of donenesses of poached eggs: soft, medium or hard cooked.  The only way to tell how it's cooked is by touching and observing really.

Here is the proper way to poach an egg:

Ged a medium sized saucepan (or pot), fill it with water and put it on the stove. 


Turn the heat up to high. Bring the water to a boil.

When the water is boiling (or about to boil) add your vinegar!
Remember: the amount of water varies. Check your ratio.

Crack an egg into a separate little dish (I used a small plastic container) to ensure that the egg is good quality. Also, just in case the yolk breaks or something. 

Drop your egg into the boiling vinegar water.


Use a slotted spoon to gently push the whites around over the yolk. Don't poke the yolk! The wispy white bits will fall off into the water, that's good, they'd make a creepy presentation. 


This is a pretty quick situation here so keep an eye on your egg! It only takes me about 5 minutes to poach my eggs...so check your egg at 4-5 minutes. Use your finger to poke the egg to check it's doneness. I took mine out to poke it, like this! 

 Describing the feeling of a soft poached egg is hard, but I'll try: it should be squishy still (obviously) because the yolk isn't cooked all the way through. However, the egg whites need to be cooked, too. So don't get too excited! Take that into consideration. But anyways, if it is done take it out with a slotted spoon. 
That egg on the edge of the pot is a funny little story. I tried to flip an over easy egg without a spatula, like instructed, but...I didn't flip it in the pan. It flew out of my pan and into my pot of boiling poaching water. Chef saw the whole thing hahaha I was his first student to do that. Whoops :) 
Make sure to drain all of the water from the egg!

Serve immediately! Eggs are made to order and should be eaten right away! You have to remember that the yolk isn't cooked all the way and letting it sit out will increase the chances of food borne illnesses. Yum bacteria :) EAT UP.