Today was the first day of my first culinary final. A lot of you are probably wondering...how does a culinary final work? Lucky for me it does not involve sitting in a silent classroom, holding a pencil and staring at a page of empty bubbles. Today was active, I was sweatin' and it was hard.
Our final consists of 34 cooking tasks in the kitchen, two of which are mystery competencies. So we did have time to prepare a "plan" for our two-day (9 hours to cook total & 3 hours to clean) final. If you know me, I'm not very organized. I like to make things look visually appealing! I like pretty colors and things looking organized! But when it comes down to it, I am a loopy scatter brain. I'm not saying it's a bad thing, it's just that I created this fat elaborate "practical exam" packet to use as a guide for my final and I didn't use it...what a waste! But look at it, you know it's pretty :)
As soon as Chef Leake said "BEGIN!" it was onnnnnn. I waddled as fast as I could to the walk-in refrigerator to grab my two chickens. Off I went. Rollin' along...the whoooole time. Since we have so many tasks we need to complete I had to remind myself finish as much as you can--one more day! and that really helped. I just gotta do what I do and hope for the best. It's crazy though, there's really no way to study for this kind of final. It's all skill. You have to remember what you did when you did it in class, the ingredients, the method of cooking...but seriously, you just have to do.
(Huge bummer though: no talking allowed!)
First day down! I finished 19 of the 34 tasks. I graciously accepted that Chef gave me three 0's and a couple half credits.
Baked Potato. Thank you stupid oven for not cooking my potato! (And my station partner had the same problem, so we blame the oven).
Perfect onion cut, medium dice. They were consistent! But not perfect. The only way to do that is to cut each piece of onion sleeve by sleeve. Seriously, who has the time for that? All of my classmates got a 0 on that one. Not one person got it!
Grilled chicken breast. Okay this one was totally my bad. I grill chicken all the time, I should've gotten this one. But I got distracted. My breast was a lil' charred and sad...so...0! It looked so bad even I had to laugh at it.
Tomorrow will be the real challenge, though. I left all of the reaaaal cooking for tomorrow. Today was a chicken & vegetable prep day basically.
Oh oh but some highlights of the final!
I heard people whispering about a trail of blood on the floor and heard Chef say that it must be chicken blood. Then later, I heard that my classmate was crying. Why? My classmate cut her finger down to the bone. She had to leave the final to go to the ER where she got three stitches. Ouch! The funny thing is she strapped on a go-pro camera to her chest before the final began to capture the experience. I thought she got some good bloody footage but it turns out she took it off right before she cut her finger.
The mystery competencies are easy! Soft poached egg and orange supremes! Hallelujah! Thank you Chef. He said that he usually chooses the two things that we're worst at...but I don't think he did that. Thank goodness. Poaching an egg takes 5 minutes and it's the easiest thing in the world! I'll show you how in my next post :)
So I don't know who is reading this, but wish me luck for tomorrow! Keep yo fingers crossed!
I'm Lil' Brown n' I 'pprove dis message.
You know who I'm talking about.
Maybe.
Well it's Sunday again, so I'm baking. Today I chose to make Browned Butter & Brown Sugar Cookies from "The Novice Chef." The recipe is here.
I just started making the cookie dough. I didn't change anything about this recipe except I'm running a little low on brown sugar, so I packed the brown sugar lightly. I love browned butter so we'll see how these cookies turn out. If you've never had it, it has a nutty buttery flavor...it's great for a lot of things. Like browned butter sauce (with sage!) and this other sauce I made in my culinary class (it had lemon and capers in it, for seared fish). Browned butter is very versatile and it's a great way to add a new depth of flavor to a recipe. I have the browned butter cooling right now!
Okay! I baked the dough! One batch I baked right away (and rolled in sugar like the recipe suggests) but they turned out sad and flat...I like refrigerating my dough before baking so I did that with the next batch. And I didn't roll it in sugar because damn those cookies were sugary! And that's coming from me...I love sugar. That's gnarly. But they did rise a bit and looked much nicer! So see what you like, experiment before you go ahead and bake all the dough!
Please excuse my potty mouth. But...really, have you ever shucked an oyster before?! That is some serious business. Clams are no problem. The clam knife goes in so easily! But those oysters! You really have to get in there. I wish I had someone to film me doing it so you could see the joys of jamming an oyster knife into the oyster's weird hole thang...maybe this is too vulgar to write about. To say the least, it was gross and I felt like I was violating those poor oysters (they were still alive!)...Sooo yeah shucking shellfish. It's awesomeeeee. It's not as scary as it sounds, but it does take some work.
Oysters are pretty!
But sometimes they have mud goop stuck in their crevices. Yum.
Use a towel (4ply) when shucking shellfish, you don't want to stab your hand.
You need an oyster knife to shuck an oyster. It has a pointed tip and looks like this.
(This is the one I have! Victorinox brand.)
Put the oyster on your folded towel rounded-side down.
(That means the flat side is up and facing you!)
Fold half of the towel over the top, like what I did in this picture.
Yeah so just stick the tip of your oyster knife in the small hole and wedge it in there (HARD) while you twist. Remember to twist!
Don't forget where your hand is. Seriously, that thing will go straight through your hand if you aren't careful. But that's why you have a towel there!
And once you get in there, work fast! Cut the membrane and get that oyster out of there! You don't want to stab it like 10 times...that would suck for the oyster and you.
If you be strugglin'
You can do what I did and sing "Twist and Shout" to yourself (aloud or in your head) and scream a bit if the oyster is making you struggle. If it's really hard though, let the oyster rest and come back to it later. The more you struggle and the longer you take, the harder it will be to shuck it. (Because it's aliveeeee and fightin!!!!)
Plop!
Yeah they'll plop out and look something like this.
Congrats, you got some fine lookin' alien fetuses.
Hehhh kidding!
But you gotta admit, something about them is fetusy.
So! We didn't shuck all this shellfish for nothin' mayne. We prepared A LOT of shellfish. (But seriously, I could write like a novel about butchering squids. Probably the highlight of class today--squishing out their guts!) Like six different kinds today! And this was because we made Cioppino!
Cioppino is an Italian-American seafood dish, a fish stew. The seafood that goes into it usually depends on the region you are in. You might see the "catch of the day" in there, or whatever the best fish on the market is at the time. I'll share the recipe with you. I'm not even a huge fan of seafood and I thought it tasted pretty good! Mehh but shrimp...I'll never be able to eat those little dudes. Seriously, the arms! Creepin' me out! I could happily butcher squids and enjoy squeezing their guts out, but pulling the arms off a shrimp is just a whole new level of creepiness.
Sorry, ranting! CIOPPINO TIME.
Ingredients:
~6 Tbsp olive oil
~6Tbsp salad oil (vegetable oil)
3/4 C mushrooms (quartered if large, leave whole if they're small--like button mushrooms)
1 C onions, large dice
4-5 cloves of garlic, whole (how much do you like garlic? consider thaaat)
4 clams, fresh & shucked
4 oysters, fresh & shucked
4 shrimp, fresh (peeled and de-vained!)
6 scallops (sea--the BIG ones), fresh
6 scallops (bay--baby ones!), fresh
6 squids, cleaned and cut
1/2 C chardonnay
10 Italian plum tomatoes (canned) *If you want to use fresh, I'd half them and cook them before
3/4 C tomato juice
3/4 C tomato puree
4 Tbsp clam juice (add reserved seafood juice from the oysters & clams if you have it!)
Fresh basil and oregano, to season
First, we need to sear all of the seafood and mushrooms (all seperately!). So, Heat up a large pan (large enough for the whole dish to fit into, keep that in mind!).
Just a heads up! Sear everything in this order:
Mushroom
All of your seafood items (seperately)
Onions & garlic together
Once the pan is hot, add your first item, mushrooms. The pan should be like SUPA hot. Don't mix them around. Let them sear. That means the side touching the pan needs to turn nice and brown. Add a little bit of the salad & olive oil to the pan around the edges.
Be patient with this, once you see that the side is browned. Toss away! Stir it up! Then let the other side sear for a bit.
When the mushrooms are seared remove them from the pan and reserve for later.
Now wipe that residue off of the pan with a paper towel and your tongs. If there's a ton of excess oil just dump it out. You don't want everything to taste like burnt mushrooms now, do you?
Repeat the same searing process for all of your seafood. So that'll be 6 rounds of searing for the seafood. Make sure to clean the pan each time!
Garlic and onions are the final items to be seared. However, leave them in the pan.
Turn the heat down a bit and add the chardonnay. Use a rubber spatula to scrape the bottom of the pan. Adding liquid to the hot pan will deglaze the crusty goodness from the bottom of the pan. You don't want to cook out the liquid, so quick, move on to the next step!
Add the whole plum tomatoes. Break them down with your spatula and mix em up in there. Cook this on medium heat. *Always be aware of the flame! Unless you're using electric, good luck to you*
Now let that saucy goodness simmer. Taste your sauce along the way!
The sauce should reduce a little, but not a whole lot, so once I added all of my ingredients I let it cook for around 10 minutes. Trust your instincts and taste buds. The best way to know if something is done is to taste it!
When the sauce is ready, do a final tasting for seasoning. Add fresh cracked black pepper if you have it and maybe even a little salt.
Yo sauce is done meow! Turn off the heat. Remember all that seared goodness? Fold it all in: the oysters, clams, shrimp, mushrooms, etc. ALL OF IT.
That's it really, eat up! Sprinkle a little Parmesan cheese (or whatever you like) on top. Serve with some crusty bread or pasta.
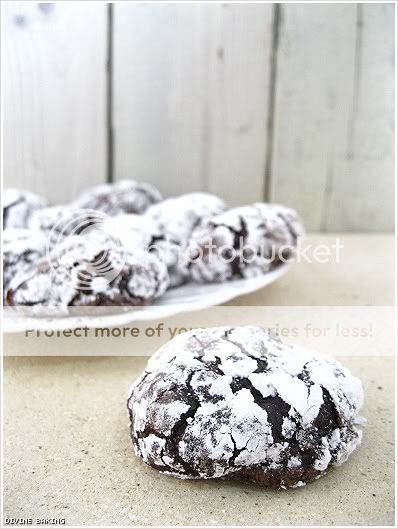
I have a new tradition. Every Sunday I bring some treats for the employees at Kokua Market. Yay! I have people to bake for! (Seriously, if I ate everything I made...I'd be like 200lbs by now). So this week I made some Mexican Hot Chocolate Cooookies :)
Basically, when I want to bake something I get this anxious feeling inside, like a big ball of energy inside of me that needs to explodeee! Okay, yeah that sounds crazy...but seriously, something like that happens! And if I don't let it explode I get frustrated. Something about baking is just so therapeutic. So to solve this exploding sensation I browse for recipes. Not to sound corny or anything...but they inspire me! It's exciting! I think of flavor combinations, recipe combinations, cooking techniques...I think to myself: what I can do to make something taste supah magical? So I usually hit up these websites (& others):
These always lead me to really cool blogs and inspiring recipes! From there I either follow a recipe that sounds good or I mix a few together.
For the Mexican Hot Chocolate Cookies I used a few websites for inspiration. Well actually, Mexican hot chocolate itself is what inspired me...I bought some the day before because it's getting chilly here in Honolulu (haaa!). But yeah allrecipes helped me out for these.
Ingredients:
2 sticks butter (room temp.)
1 C white sugar
1/2 C light brown sugar (packed!)
2 eggs
2 tsp. vanilla extract
2 C AP flour
~3/4 C cocoa powder (I used a lot...I really like chocolate.)
3/4 tsp. baking soda
1/4 tsp. salt
1.5-2 tsp. cinnamon
1/4 tsp. cayenne pepper
2 C semisweet or dark chocolate chips
Shake n bake emmm cookie timeeeeee!
Preheat your oven to 350 (F) degrees (if you want to bake the cookies right away! If you're going to chill the dough...wait, conserve energy please!)
Mix your butter and sugar (white & brown) together until fluffy. You can use a mixer, I don't because I don't have one in my apartment. I'm sure it could make your life easier!
Next, mix in your eggs! And that vanilla extract mmmm!
Mix in your cocoa powder (slowly...or else it might explode out of your bowl and onto you), salt, cinnamon & cayenne pepper
Add your flour now, I add mine in like 3 parts so that it doesn't explode everywhere because dry ingredients like to do that sometimes.
Fold in your chocolate chips.
Dough is complete! I prefer to refrigerate my dough for a bit before baking them. So pop em in the fridge if you like for about 30-60 minutes. (If you're eager, I guess you can get away with skipping this step). Also, you might wanna preheat your oven now...if you're putting the dough in the fridge.
When you're ready to make the cookies. Scoop dough balls that are about 1.5 Tbsp.
Bake for 10-12 minutes
Let them coooool (at least for a minute!) then enjoy :) They're super good melty and warm with vanilla ice cream oohlalaaaa
IF YOU REALLY LIKE TO MAKE COOKIES.
Please, buy one of these.
I finally got one! A COOKIE SCOOPER! I decided it was time to treat myself to a lil' somthin'-somthin' because finals are coming and the stress is overwhelming sometimes. If you aren't a baker you might not realize how convenient this little gadget is, but seriously...life changing in regards to cookie making. No messy hands. No ghetto two-spoon scraping (the cookies won't be the same size yo). This thing made my day. Totally work the 13$. I'm sure you could get a cheaper on online...but thank you, Williams-Sonoma, for the instant gratification :)
Tomorrow will be my first day going back to class since...the 16th? Wow! Last week we only had two days of school because of Thanksgiving, but I got sick and missed those two days. So it's been a nice long break. I'm ready to go in, do work, and go homeeeeeeeeee.
They were pretty good! I think the cinnamon makes them a little more holiday-ish than regular brownies. I always read reviews before I make something then alter the recipe a bit if it sounds like it needs help. So for this recipe I lowered the amount of brown sugar to 1.5 C (packed). And for the topping I used more than just a "pinch" of turbinado sugar. I used like 1 Tbsp or more.
I also finally made Sharpie Mugs!
This stuff is alllllll over pinterest. I thought this would be a cheap and entertaining thing to do. So I dragged my sick nastiness out to Walmart (classy times) to pick up some:
*Sharpies (I got a colored multi-pack, I just really like Sharpies)
*A few plain white mugs
That's really all you need.
But I read about this project online a bit before I actually did it. There are rumors that this is a "crafting myth" or something...crazy people doin' crafts wrong yo! Someone sounded promising when they said to turn the heat up to 450 degrees instead of 350. I guess the ink will smear or rub off when you wash your mugs. So I did that. Also, f you use color, the colors will fade! I was kind of sad about that. But I think the turquoise blue color looked good and the dark dark pink. The other colors are too light and fade a lot...but try it out and see how it works for you. Maybe my oven is weird. Also, some people said to use special ceramic paint pens. I'm sure those would work a lot better than Sharpies...but I'm ghetto and I like Sharpies...so Sharpies worked for me, they can work for you, too! Yup yup so that's what I have to say about that project. Go try it out! It's Christmas season people! Make mugs for your friends, family, co-workers, maybe a Sharpie-ed dog dish for your dog? Yeah! Oh, and make sure to handwash...that's the only real bummer about this one.
Thanksgiving break is almost over, I have two more weeks of class (that's five days of class and a two-day final), nineteen days until I fly home, and thirty days until Christmas! Seems like time is flying! But really, all I want right now is for my class to be over. I want school to be over for the semester. I just want to board a plane and fly home to Santa Cruz. It hardly feels like winter when it's still 70 degrees! I miss my big baggy sweatshirts, sweatpants, blanket nests in bed and a nice warm fire place--ooh and especially waking up to the sound of rain. So nineteen more days and I'll be there! Good old Santa Cruz :)
Anyways, what I was trying to get to is...it's baking season yo! I don't have the money and time to bake all kinds of crazy things right now, but as soon as I get home IT'S ONNN. Until then, I'll be scoping out the latest and greatest recipes of the web. I'll share them with you and maybe you can test them out before I even get a chance to!